
A padel court can arrive with well-made components and still become a difficult project if the foundation, delivery, installation sequence, and decisions on site are not coordinated. Conversely, an experienced crew can identify a discrepancy early, document it, and work with the club owner and manufacturer before a small adjustment becomes damaged glass, a misaligned enclosure, or a delayed opening.
This guide is written for club owners and investors buying a court from a fabricante de pistas de pádel, as well as the contractors who will build and install it. It covers seven decisions that affect quality, safety, schedule, and total padel court installation cost. PanoCourt installation specialist Mr. Dong contributes practical site advice, especially on foundation levels, laser layout, mesh alignment, and when a crew should stop and escalate a problem. His recommendations here are presented as professional guidance, not as a substitute for the approved project drawings or local engineering sign-off.
Appoint an experienced installation team before delivery; agree on a site-specific foundation design and court model; inspect every shipment; establish and verify geometry before anchoring; fit mesh and glass without forcing parts; stop when the sequence or numbering becomes uncertain; and hand over measured, photographed records. The manufacturer, installer, club owner, and local engineer each supply information the others need.
PanoCourt Installation: Who should coordinate the project before the shipment arrives?
The club owner should name one project decision-maker and bring the installer, PanoCourt, and local design professionals together before dispatch. They should confirm the exact court model, bill of materials, packing list, latest approved drawings, site levels, anchor design, lifting plan, and a single issue-reporting channel. A video call is useful when the installation crew has not assembled that model before.
Early involvement prevents the first installation day from becoming an improvised design meeting. The factory knows the component set and intended connections. The installer knows the access route, slab condition, available lifting equipment, and local labor. The engineer owns the site-specific structural and anchoring design. The investor controls time, budget, and change approval. No one party has a complete view without the others.
What should the pre-installation meeting produce?
- A document register: revision numbers for the court layout, foundation and drainage drawings, anchor schedule, steel assembly drawing, glass schedule, mesh panel numbering, electrical/lighting plan, and turf specification.
- A site readiness record: surveyed dimensions and levels, concrete age/strength evidence where relevant, anchor-zone dimensions, drainage outlets, access and storage areas, and local approvals.
- A delivery plan: container or truck arrival, unloading method, package count, lifting and storage responsibilities, and who signs the receiving report.
- A decision path: the installer records a discrepancy; the owner and PanoCourt receive photographs and measurements; the responsible engineer reviews structural changes; the owner authorizes an agreed remedy before work resumes.
For imported courts from China, plan a direct route to the project site or a controlled local depot where practical. Every additional transfer creates another handling event, so minimize unnecessary unloading and reloading. If a transfer is unavoidable, photograph the packaging at handover, reconcile package numbers against the packing list, and note damage before the next carrier takes possession. This is a practical control, not a claim that all transshipment causes damage.
El Lawn Tennis Association’s padel construction guidance advises buyers to assess installers and project requirements early; its details are written for the UK and should be adapted to the project’s jurisdiction. PanoCourt’s own construction planning guide is a useful conversation starter, but the approved site drawings control construction.
PanoCourt Installation: How flat and thick must the foundation be?
Answer: There is no safe universal slab thickness or single “foundation tolerance” for every PanoCourt installation. The local engineer must design the foundation for the soil, wind, seismic and drainage conditions, the selected enclosure, and the specified anchors. Before steel is fixed, the installer must survey the finished bearing surfaces, compare them with the approved drawings, and have unsuitable areas corrected.
Mr. Dong’s first field check is simple: the base must be level enough for the structure to be installed to its designed geometry. A post should not be intentionally leaned to make an uneven base look acceptable. A sloping or irregular support can change baseplate bearing, post plumb, mesh alignment, glass clearances, and door operation. Those effects compound around a 20 m by 10 m court.
Why are thickness and tolerance often confused?
“The foundation” includes several different layers and interfaces. The excavation formation, compacted sub-base, engineered reinforced concrete ring beam or slab, asphalt or other playing surface, and baseplate grout/bearing each have different purposes. A tolerance for an early earthworks layer is not permission to leave the finished court or anchor surface equally uneven.
PanoCourt’s preliminary planning guide gives 150–250 mm as an example range for a reinforced full slab, depending on site conditions, and describes a ring beam or engineered pad foundations as alternatives. This range is no a construction specification. The engineer must determine the actual section, reinforcement, concrete grade, drainage, anchor embedment, and edge distances. Brickwork should not be assumed to be a suitable structural anchor base unless the engineer has specifically designed and approved that system.
For a published industry example, the Sports and Play Construction Association (SAPCA) Code of Practice for Padel Courts, fifth edition (2025) gives a +25/−50 mm tolerance for the compacted formation during ground preparation. That is an earthworks checkpoint, not the finished slab or court-playing-surface tolerance. SAPCA’s UK example for a new porous-asphalt court uses 40 mm binder plus 25 mm surface course, with the sub-base depth selected from ground conditions. Its completed playing-surface criterion permits up to ±6 mm undulation under a 3 m straightedge. Separately, the FIP Rules of Padel (2026) state a stricter playing-surface difference of less than 3 mm under a 3 m rule and a 0.5% tolerance on the 20 m by 10 m interior court dimensions. The formation tolerance concerns an earlier construction stage; the two finished-surface criteria come from different documents and should be reconciled in the project specification before work begins.
What if the foundation is already uneven?
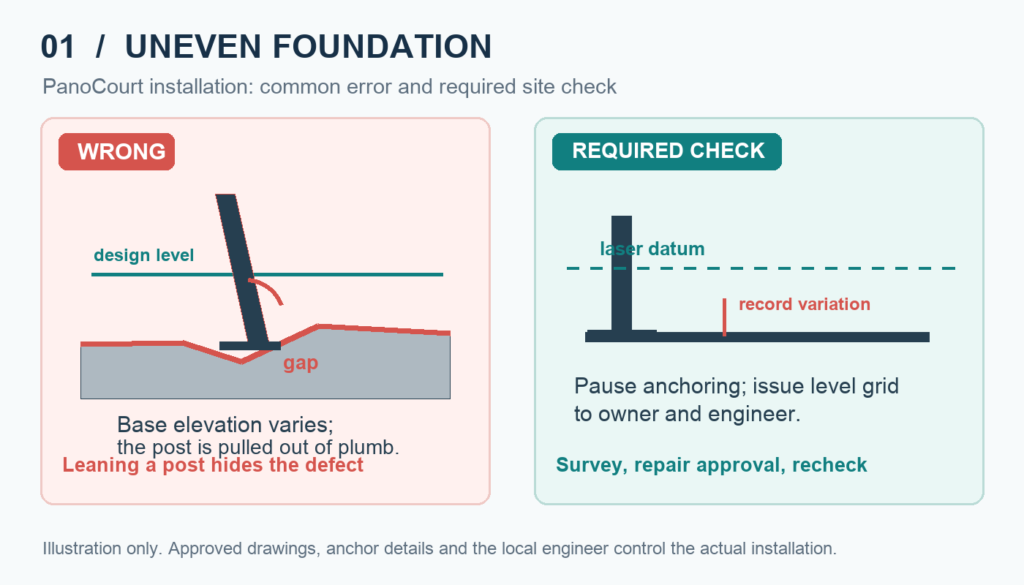
- Stop fixing the affected posts and record a level grid with a calibrated laser level or total station. Include the datum, instrument location, date, and photographs.
- Separate a local high spot, a local low spot, a sloped slab, a misplaced anchor zone, and a wrong court footprint. Their remedies differ.
- Send the survey to the owner, PanoCourt, and the local engineer. Agree on a repair such as an engineer-approved grind, repair mortar, grout detail, or reconstruction of the affected area.
- Repeat the survey and document approval before drilling or anchoring. Recheck drainage and the finished playing-surface level.
Shims or packers may be permitted only where the approved baseplate and anchor design allows them. Do not assume that filling a gap, cutting a baseplate, moving an anchor, or using longer bolts is harmless. The Hilti anchor installation guidance illustrates why drilling, hole cleaning, embedment, edge distance, and the manufacturer’s installation procedure matter. The specified anchor system and engineer of record govern the final method.
PanoCourt Installation: What must be checked when the shipment is received?
Answer: Before assembly, the receiving team should compare every package with the packing list, count glass and steel components by label, photograph packaging and any scratches or distortion, and segregate damaged or uncertain parts. The owner and manufacturer should receive the same dated discrepancy list promptly. A signed delivery receipt should record visible exceptions rather than implying that every component has been accepted as sound.
Unloading is part of quality control. Provide a level, protected storage area with access for the glass stillage and long steel members. Keep the component labels visible. Never lay a large tempered-glass panel on a hard corner or let it bear against exposed metal. Match the measured glass sizes, thickness markings, hole positions, and edge condition to the approved schedule before the panel is lifted into its final position. Look for coating chips at welded edges, bent mesh, missing fasteners, and box numbers that do not match the erection drawing.
If parts arrive after multiple inland or ocean handling stages, the shipment may have more than one damage record. Photograph the container seal, packing condition, package IDs, and each affected item while it can still be traced to its crate. The objective is quick resolution, not premature blame: transport damage, manufacturing variation, and handling on site can look similar after components have been unpacked and moved.
A practical receiving log has columns for court number, package ID, drawing part number, expected quantity, received quantity, condition, photograph ID, and action owner. Record the exact model and revision. A panel from one three-court package may resemble another while having a different drill pattern or position. The same log should follow an issue from discovery to replacement, approved repair, or documented acceptance.
Owners can budget for quality control in three simple cost categories: receiving labor and safe storage; survey and correction of the foundation; and a small contingency for damaged or missing parts. Those costs vary by site and market. Their purpose is to avoid more expensive rework after glass, turf, and lighting have been installed. An experienced installer helps by finding the discrepancy while the remedy is still small.
PanoCourt Installation: How should the laser layout locate corner posts and the steel frame?
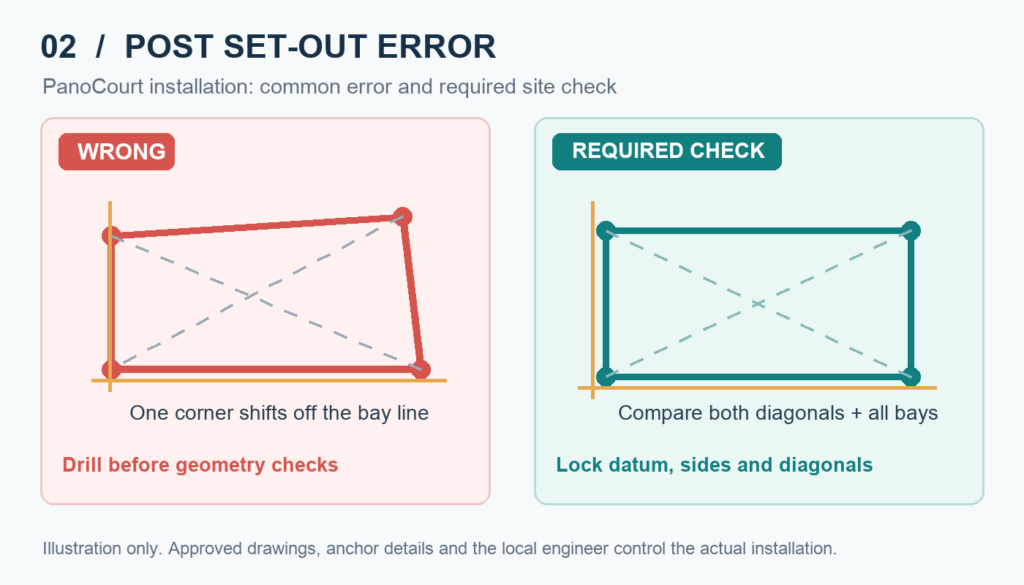
Answer: Establish one surveyed datum and two perpendicular control axes, then use a laser instrument or total station to mark the four corners and each post center from the approved drawing. Verify the interior length and width, both diagonals, baseplate locations, and finished levels before drilling. Fix a small number of reference posts, check their plumb and alignment, then continue around the enclosure.
Mr. Dong recommends setting the corner positions first because every later post and panel refers back to them. A chalk line alone may be hard to preserve on a busy site; keep permanent reference marks outside the working footprint. Use a laser distance meter to confirm the distance between each corner and intermediate post, and a laser level or total station to carry the same height datum around the court. Record the actual readings; a photograph of the laser line by itself does not show the measured dimension.

A repeatable five-check layout routine
- Freeze the datum: agree where the 0.000 level and two plan axes are located, and protect those marks during installation.
- Set four corners: mark post centers from the current drawing, with the playing-side face of the enclosure checked against the required clear court size.
- Compare diagonals: measure both diagonals to detect an out-of-square rectangle. Equal diagonals alone are not sufficient; also check side lengths, orthogonality, and the internal clear opening.
- Set intermediate posts: measure each bay and match each labelled part to its drawing position. Survey the baseplate bearing and anchor zone before drilling.
- Dry-fit and record: temporarily position frame members and mesh to reveal any hole mismatch before final tightening; then record the as-built post centers, plumb, and levels.
The FIP rules specify an internal court of 20 m by 10 m with a 0.5% dimensional tolerance, plus enclosure requirements that affect how the playing-side faces meet. This does no establish a universal ±0.1% or ±0.2% fabrication tolerance for all custom steel parts. Steel fabrication, coatings, site set-out, anchors, and assembly all have their own tolerances; the applicable contract drawings and component specifications must define them. The American Institute of Steel Construction’s discussion of fabrication and erection tolerances explains why tolerances need to be applied to the right element and construction stage.
PanoCourt Installation: How should mesh panels and glass be aligned without forcing them?
Answer: Install the steel frame to the approved line and plumb, loosely fit correctly numbered mesh panels, use the designed adjustment slots within their specified range, and only then tighten the approved fasteners. Measure the opening and glass clearances before lifting each pane. If alignment requires forcing, enlarged holes, improvised welding, or pressure on a glass edge, stop and obtain an approved correction.
Mesh connection holes or slots can allow controlled fit-up: they help bring adjacent frames onto a common line when the base geometry is correct. During loose assembly, a panel may move inside a slot as fasteners are adjusted. That temporary movement is not the same as a panel slipping after final tightening. Persistent post-tightening movement, loss of clamp force, elongated holes, or a panel that cannot align inside the designed slot range needs investigation. The installer should check the specified washers, bolt grade, tightening method, hole condition, and whether the wrong part or panel number has been used. Do not assume that movement is normal on every project or that it cannot affect the finished enclosure.

Before installing glass, verify the steel opening, finished surface, protective gaskets or spacers, and each glass panel’s size, edge finish, marking, and hole pattern. SAPCA’s UK code describes a typical 3–6 mm gap between glass panels; the approved system drawing must confirm the actual detail for this court. Follow the glass supplier’s handling instructions and never use glass as a lever to pull the frame into place. Pilkington’s guidance on diagnosing glass breaks highlights edge damage and installation stresses as relevant causes to inspect, rather than deciding the cause from a photograph of broken glass alone.
Complete the doors and hardware only after their frames are square. Check that doors swing freely, close and latch as designed, and do not strike turf, glass, or adjacent steel. Install lights and electrical components under the approved electrical design and local rules; then install the specified turf, infill, net, and accessories. The FIP rules also give game-related checks for the net height (0.88 m at center and 0.92 m at the ends) and playable enclosure. Component adjustment cannot compensate for a fundamentally wrong footprint or foundation.
PanoCourt Installation: What if panel numbering or the assembly sequence goes wrong?
Answer: Stop work on the affected bay immediately. Keep the installed state safe, take wide and close-up photographs, measure the relevant openings and diagonals, and reconcile the panel labels with the approved drawings and packing list. The installation crew should report the facts to the club owner and PanoCourt before cutting, drilling, swapping unidentified parts, or continuing a sequence that may compound the error.
A practical order is: site and foundation acceptance; shipment inventory; datum and corner set-out; baseplates and primary posts; upper beams and bracing; numbered mesh; glass; doors and fittings; lighting and electrical checks; turf and infill; net, cleaning, and handover. The manufacturer’s model-specific manual and engineered drawings override this general sequence. Some enclosures require temporary bracing or a different glass/mesh order to remain stable while partially assembled.

For each stoppage, send one evidence packet: court and bay number, part labels, drawing revision, measured opening width/height/diagonals, slot position, level and plumb readings, fastener detail, overview photographs, close-ups with a scale, and the proposed next decision. This helps the factory distinguish a mislabelled part, a fabrication discrepancy, shipping damage, an out-of-position post, or a site foundation error. Do not edit or crop away the labels in the only photograph.
What can an anonymous three-court project teach us?
In a recent anonymized three-court project in Southeast Asia, questions about fit, visible finish, and the installation outcome were raised after significant assembly work. The available accounts point to several possible contributors, including site levels, component dimensions, handling, and installation decisions. The evidence does not establish one confirmed root cause or a single responsible party, so this case should be used as a process lesson rather than an allegation against the customer, installer, carrier, or manufacturer.
The lesson is timing. A dimension mismatch reported before anchoring or glass installation can be checked against the drawing, production record, and site survey. The same mismatch reported after three courts are substantially complete is harder to reconstruct and more expensive to correct. The owner should require a signed hold point after the first court’s corner set-out and another after the first representative mesh-and-glass bay. A three-court build can then repeat an agreed method rather than repeating an undiscovered error.
This process also protects the installer: measured records show what was found, when it was found, and which correction was approved. The owner sees schedule and cost effects early. The manufacturer receives enough information to provide a part, revised instruction, or engineering review. Responsibility for a defect can be assessed fairly once the facts are established; it should not be guessed from the final appearance.
PanoCourt Installation: Which tools, inspections, and handover records are essential?
Answer: Use calibrated survey tools for geometry, the specified drilling and fastening equipment for anchors, protected lifting tools for glass, and a written inspection checklist at each hold point. Hand over measured as-built records, photographs, product and anchor documents, electrical test results, maintenance guidance, and a punch list closed by named owners. A court is complete when these checks support safe use, not when it merely looks finished.
| Installation tool or record | Purpose on site | Typical checkpoint |
|---|---|---|
| Rotary laser level or total station | Carry one elevation datum; locate axes, post centers, and finished levels | Before drilling; repeat after frame erection |
| Laser distance meter and calibrated steel tape | Check side lengths, intermediate bays, diagonals, and clear openings | Corner set-out and each representative bay |
| 3 m straightedge, feeler gauge, and level staff | Measure surface undulation and baseplate bearing against the agreed specification | Foundation acceptance and turf substrate |
| Plumb laser or digital inclinometer | Check post verticality and reveal cumulative frame drift | Reference posts and before final tightening |
| Approved drill bits, depth gauge, hole-cleaning kit | Install anchors to the selected system’s hole, depth, and cleaning requirements | Every anchor group; follow manufacturer instructions |
| Calibrated torque wrench or specified fastening tool | Tighten mesh, steel, and anchor fasteners to approved values | Final tightening and recorded sample checks |
| Rated suction lifters, A-frame, and edge protectors | Move and position glass while protecting edges and workers | Receiving, storage, and glass installation |
| Labelled parts register and camera | Trace each panel, issue, decision, and repair to its court and bay | Receiving through final handover |
| Electrical test instruments and light meter | Check electrical safety and measured lighting performance where specified | Before energizing and handover |
| Turf tools and calibrated infill measure | Lay, join, brush, and fill turf to the turf supplier’s system instructions | After structural and glass sign-off |
The final inspection should compare the as-built internal court size, glass and mesh line, door function, fastener condition, anchor documentation, surface level, drainage, turf seams and infill, net height, lights, and exposed sharp edges with the approved project requirements. Photograph each façade and key connection. Record any outstanding work with an owner and deadline. The SAPCA code includes maintenance inspection guidance; this matters because bolts, glass, turf, drainage, and coatings remain in service after the contractor leaves.
For investors comparing bids, ask each installer for a scope that includes survey visits, unloading/receiving, lifting equipment, foundation hold points, structural assembly, glass handling, electrical coordination, turf, waste, final tests, and handover records. A lower quote that omits these tasks can shift cost and risk into change orders. The exact allowance should reflect local labor, access, equipment, and site conditions rather than a universal price per court.
PanoCourt Installation FAQs: What do club owners ask most often?
Answer: Club owners most often ask who should install the court, how to handle an uneven base or a part that does not fit, and what records they need before opening. The answers below give practical decision rules for those questions.
Does PanoCourt installation require a specialist crew?
Yes. Choose a crew with documented padel enclosure, structural anchoring, large glass handling, and turf experience. Ask for references from comparable projects and confirm who supervises the first court and signs the hold points.
Can an installer correct an uneven foundation by tilting the posts?
No. The base, anchor, and playing surface should be surveyed against the approved design. The local engineer should approve the repair; posts must then be installed to the specified plumb and line.
Is a 150–250 mm concrete slab always enough for a padel court?
No. That is a preliminary example range in PanoCourt planning material, not a universal design. Soil, wind, drainage, anchors, seismic conditions, and local codes can change the required foundation type and thickness.
What is the correct PanoCourt installation order?
Accept the site and inventory, set out the datum and corners, erect and brace the structural frame, fit numbered mesh and glass as the model-specific manual requires, then complete doors, lighting, turf, net, tests, and handover. Follow the approved manual where it differs from this general order.
Do slotted mesh holes mean a panel may keep slipping?
No. A slot may allow adjustment while the joint is loose. Movement after final tightening should be checked against the fastener specification, clamp condition, hole condition, and alignment; it should not be dismissed as inevitable.
Who pays if a part does not fit?
That depends on the contract and documented cause. Measure the part, frame opening, and site positions; preserve labels, photographs, drawings, production data, and receiving records. The owner, installer, and manufacturer can then agree on the cause and remedy.
Should courts imported from China avoid transshipment?
Where logistics and cost allow, fewer transfers simplify handling and traceability. If a transfer is necessary, use a controlled receiving count and photograph packaging and damage at each handover. Direct shipping alone does not eliminate all transport risk.
When should the installation team contact PanoCourt?
Before delivery for drawing and model coordination, and immediately when a foundation, dimension, label, hole, glass, anchor, or sequence discrepancy is discovered. Send measured evidence before making an irreversible site modification.
What should a club owner receive before opening?
Obtain the as-built survey, inspection and punch-list records, anchor and glass information, electrical test results, product documents, warranties where applicable, maintenance instructions, and the named contact for unresolved issues.
PanoCourt Installation: What should the owner do next?
Treat installation as a managed construction project. Before signing off shipment or scheduling a crew, request the exact model drawings and packing list from PanoCourt, appoint a qualified local engineer and experienced installer, and agree on survey and reporting hold points. That gives the investor a clear route to resolve problems while they are still measurable and repairable.
PanoCourt supports the project with manufacturing information, component identification, and installation guidance; the local engineer and installer turn that information into a compliant, site-specific build. If you are planning a new club or multiple courts, contact PanoCourt with your location, court model, site drawings, foundation status, delivery date, and installer details. Ask for a pre-installation review call and a coordinated drawing package before the container arrives.